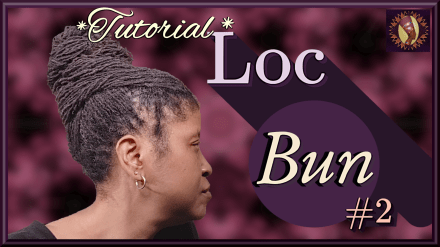
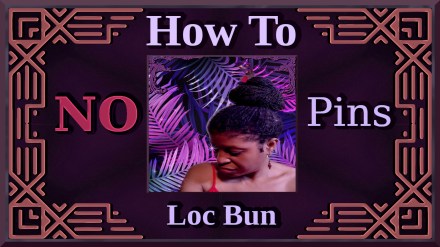
Hey y’all! Here’s another No Pin Loc Bun that I came up with. I think this along with the first bun that I did can also be done on loose hair, braids etc and it is so elegant that it can just as easily be used for occasions like weddings, balls etc, where you are dressed to the nines.
Hey y’all. It’s been a minute, right, LOL. Here’s a little tutorial I did last year for a high updo/loc bun using no pins at all to keep it up. Of course, my locs are a bit long, so if you have shorter locs you may have to use a few pins.
It is perfect for the summer when you want to get your locs off of your neck or anytime of the year.
Or when you wanna dress up and wear a simple, yet elegant updo.
Hope you like it and if you do this with your own twist on it let me know in the comments below.
I got this email from one of my readers or possibly YouTube subscribers and decided to answer it in a post or two as they are the “issues” I mentioned I had with my locs in my 5 year Braidlock post. Here is part of the email:
“….however, I have failed to find an answer as to why the loc tips lose colour – they look tinted. how can I avoid that. Secondly i am in the process of removing one of daughter’s locs due to unsightly lint, so much that when i look at it, i lose the joy! Yet, I don’t have any except at the back row. Please help!..”
Now I am not a scientist of any kind so what I’m about to say is strictly my opinion based on a bit of research and putting stuff together in my head! Results are not guaranteed. lol
Having said that, I think the reason the tips look tinted is due to oxidation of the hair which is a natural process but can be inadvertently hastened. It just looks more prominent on locs probably due to all the hair strands being wound together thus making it a lot more noticeable than on loose hair. If one observes, it’s there on longish loose hair as well but you must be looking at it at the right angle in sunlight, ie the red-ish tint you can see on someones hair that you know does not dye or henna their hair. The other reason I say on long-ish hair is that the oxidation is on the ends which is the oldest part of the hair and takes awhile to show up. You more than likely will not see it on shorter hair because the old ends have been cut off or broken off.
I’ve noticed this on my braidlocks/dreadlocks as well and of course on the bottom 1/3 of the locks. I really noticed it today with my hair in a half-up, half down style. Not sure if you can see the color difference in the pic but I can definitely see it.
Now, I bet you’ve heard of people naturally bleaching their hair with lemon juice and sunlight. Yeah the same process is going on with our hair without the lemon juice thus at a slower rate.
Can this be prevented? Again, I’m not a scientist but I don’t think so. However, we may be able to slow down the process. Wearing a hat while outside is probably one way. Though not always practical especially in the middle of summer in the very hot regions of the country where temps can get above 95 degrees. Diet always places a big part in how our hair looks so start there by making sure you are getting enough vitamins and nutrients like protein, vitamins C & E.
Vitamins C & E are known as antioxidants. Hmm… antioxidants. The last part of that word should ring a bell. Oxidizing is what the sun and air is doing to our hair so it makes sense to me to put things on the hair that contain some version of these two vitamins to help slow down this natural process.
I also stumbled upon something while researching what herbs to put in my herbal coconut oil to make it like a leave in conditioner for my locs. One ingredient that is added to conditioners is called a sequestrant. From Wikipedia:
” A sequestrant is a term for a food additive. Sequestrants improve the quality and stability of the food products. Sequestrants form chelate complexes with polyvalent metal ions, especially copper, iron and nickel, which serve as catalysts in the oxidation of the fats in the food…”
The reason for this additional ingredient in conditioners is so they will function better in hard water. Ok, the bolding of the word oxidation is mine. Now I know they are saying “the oxidation of the fats in food” but why would I want to put something on my hair that causes oxidation of any kind when that’s one of the things I’m trying to prevent or at least slow down in the first place? I’m all about prevention, not having to fix the problem after the fact. Plus, I don’t want to oxidize the oils which are fats on my hair. Even natural sebum contains fatty acids. This is probably done so that the conditioner can bond to the hair as they’re designed to leave a tiny bit of the conditioner behind on the hair even after it is rinsed it out.
Needless to say, this is one of the reasons I stopped using conditioners. For the brief period I was using them I noticed that “ashy brown tinted’ look on my locs. I must note that I was in the sun a lot more back then as well.
So since using oils and herbs to condition, I’ve noticed the ashy brown has gone to a little darker brown. Still there, but looks a lot better and almost deliberate. Hibiscus is a great source for Vitamin C and I bet that’s why it’s used in Indian hair care. Grapeseed oil has Vitamin E and of course my personal favorite, coconut oil! So this maybe something to think about.
Hey guys!! I know I’ve been away for a while but I’m back. 🙂
I just wanted to share with you guys something I ran across actually a few months ago. What is that? Grapeseed oil. I found it at my local Wal-Mart grocery store and decided to try it as I remembered reading rave reviews on it for natural hair back when I was a loose natural. Don’t worry as this oil is NOT going to replace my beloved coconut oil. There is another reason I wanted to try it as I’ve been looking for an oil that stays in a liquid state to blend with my herbal coconut oil mix. I figure that would help in keeping it “soft” in the winter. What do I mean by “soft”? Because of the saturated fat in coconut oil, it becomes a solid at temps below 77 degrees F.
English: Coconut oil in solid state (Photo credit: Wikipedia)
Since I’ve started using my coconut oil infused with herbs, you can see what herbs I use here, the herbs seem to help the oil stay soft. I just wanted to see if I could improve on the “soft” with an oil I can find locally and reasonably priced. This mix is the only thing I’m gonna use the grapeseed oil for. And as y’all already know and if you don’t, my hair does not like olive oil. I may be infusing this grapeseed oil with some of or all of the herbs that I use in the coconut oil at a later date but for now, I’ve put some in with my already infused coconut oil.
Well this is an update as I had already started this post shortly after trying this new oil. After several months of using this grapeseed oil mixed in with my herbal coconut oil, I’m not crazy about it. To me, the consistency is a little to close to olive oil for my liking. Basically that means just a little bit too heavy and the smell is almost like olive oil.
Now I’ve looked around on the internet and everything I’ve read says this oil is odorless so maybe it’s the brand that I got or the bottle ended up in the olive oil conveyor belt and got mis-labeled.
It was only $5 for a 24 ounce bottle so that may have something to do with it but again from what I’ve read, grapeseed oil is inexpensive compared to extra virgin olive and coconut oil. That being said, I’m not sure I’ll be trying another brand on my dime. So, I’ll be using the remainder in a mix for skin use only, or and sticking with my herbal coconut oil.
What is your favorite oil for your hair? Vote in the poll and tell me why in the comments.
Hey y’all I promised in my post here that I would share my herbal coconut oil concoction. I did videos on my YouTube channel earlier last year but forgot to blog about it here.
The inspiration to make my own herbal oil came from hearing about Vatika Coconut Oil, Nyle Herbal Hair Oil and the Profectiv Hair Strengthener. The Profectiv was given as a present to all the ladies at my husband’s family reunion in 2009. I was already using Tropical Traditions Gold Label Coconut Oil so I thought what if I could make my own Vatika, Nyle/Profectiv type oil using coconut oil.
The inspiration for the choice of herbs I used are from some of the ingredients listed on the jar of Profectiv Daily Anti -Breakage Hair Strengthner I had and the Nyle Herbal Hair Oil I had researched after hearing about it on YouTube. Back then the Profectiv was not an oil but a…well, I really don’t know how to describe it. It was a milky color with a slight pink tint and had a loose gel like texture. They were listed as extracts however I was impressed by the number of natural things in it like horsetail and sage . Glycerin was and still is in the product… but pretty high on the list back then. Nice for attracting moisture but I really dislike the sticky feeling it leaves on my hair. For me, it also attracts dirt, something I definitely did not want to do for my locs. And you were supposed to be using this stuff daily. I never bought the Nyle Herbal Hair Oil but it’s ingredient list showed it had hibiscus and fenugreek extracts along with coconut oil.
This was three years ago as I see now at the time of this post, the list of ingredients for the Profectiv has changed quite a bit. Currently, Propylene Glycol is quite high on the list of ingredients with silicones following close behind. I’m not sure but I don’t think it was like that back then and if it was on the list it was close to the bottom. Otherwise I would have never used the product. It also has Lanolin, Olive oil and silicones that I don’t remember being in the product either. I think I’ve mentioned before that my hair does not like Olive Oil nor silicone.
That’s another reason why I wanted to make my own product because I know how companies for various reasons, will change the formulation of a product by adding cheaper chemicals. I wish that I would have kept the label on the jar of Profectiv so that I could see changes at the time of this post vs when I first did my concoction oil. I also think Nyle Herbal Hair Oil has changed their formulation as well because I don’t remember seeing mineral oil listed as an ingredient. No surprise really but…Wow!
The other inspiration was from research done on Anita Grant’s old website and other websites for information on herbs for dry hair.
Now, the trouble was I had no idea how to get the herbs into the oil. Thanks to a YouTube friend and subscriber and also Annie’s Remedies, I learned how to do herbal oil infusions. I would give y’all the link to her channel but I recently discovered she’s no longer on YouTube. 😦
OK, here’s what I came up with.
Ingredient list:
Virgin Coconut Oil – of course right?! However use whatever oil you like.
English: Flower of a Yellow Chamomile (Anthemis tinctoria) Français : Fleur d’Anthémis des teinturiers (Anthemis tinctoria). Português: Flor de Camomila-dos-tintureiros (Anthemis tinctoria). (Photo credit: Wikipedia)
Shavegrass (Horsetail)
Slippery Elm Bark
Violet Leaf
Citric Acid for preserving and
Glass jars w/lids (recycled ones are awesome) to hold all of the goodies.
Keep in mind if you want to follow the actual Vatika Oil or the Nyle oil ingredients, by all means do so. I wanted to use herbs that were readily available to me at my local health food store.
For those of you that have been with me for a while already know the answer to the question “How much of each do you use?” 🙂 For those of you who don’t, the answer is… I don’t have a set measurement amount. Heck, I hardly ever measure anything. lol However I will use the same spoon or whatever device I’m using and add more of some herbs like sage, rosebuds and nettle. I add according to what I feel like my hair needs. It’s also dependant on the size of the glass jar you choose. Ok here are the intricate instructions: 😉
Put one round of all the herbs into the jar.
Melt the oil getting it nice and warm. You can do this while you are putting your herbs in the jar.
Pour some oil into the jar making sure to cover the herbs and mix very well. It helps to use a folding method like you’re mixing ingredients for a cake or pie and a pumping motion. This insures that the herbs at the bottom get mixed in with the herbs at the top. It also helps to get any air pockets out. See the note below.
Add another round of herbs, then oil again covering the herbs and mix well.
Repeat step 4 until your jar is full and screw the lid on very tight.
See… It’s pretty easy but a little bit time-consuming. If you’ve already scrolled down and watched the video you might have noticed that I’ve changed the instructions a bit. I remembered from the last batch I did ( the video is the filming of it) that it’s a little difficult to mix the oil and herbs when the jar is full of herbs. I’m thinking doing it in the way I have listed above should be easier.
Also it should help in making sure that you have the most amount of oil you can get in to be infused with the good stuff from the plant material. I guess because you are dealing with oil and not water it takes a bit longer for the oil to penetrate the plant material and absorb the oil. Heating the oil helps with this and so does the mixing.
***Note: be careful when mixing with a metal utensil as constant tapping on the bottom of the jar can cause it to crack!***
You’ll want to make sure that the finished jar has oil covering the herbs as this helps to keep the herbs from going rancid (spoiling).
To heat the mixture in the jars, I use an old crock pot, the kind with the ceramic insert. I put the jars in and fill it with water then turn it on the lowest setting of heat. I do this for 8 or more hours per day for 2 weeks. Then I label the jars with the date and put them aside to set for at least 6 months.
When that time has passed, strain out the plant material using a strainer to get the big stuff out. Re-strain using a knee-high stocking to get the smaller particles into your storage jar. You can add essential oils like lavender for further preserving and others for additional benefits for your hair or fragrance.
The resulting oil will be dark green almost brown in color. This will vary of course depending on the combination of herbs used to infuse into the oil.
In the next post I’ll cover why I chose to use this method. If you want to see how I do the infusion check out the videos below.
The same videos are available on my YouTube channel here, here.
Hey! I hope that you all had a wonderful Thanksgiving if you celebrate it and if you braved the Black Friday crowds that you did not spend too much money.
I forgot to mention in my 4 year update that I’ve noticed that my hair was shedding. I remembered back in the day when I had a Jheri curl that my hair shedding had been reduced tremendously. Probably because of the activator and moisturizer that you had to put on it. Otherwise your hair would break off from being dry.
Now I’m not trying in any way to revive those days but what I have been doing the past couple of weeks is to use a tiny amount of my herbal coconut oil (I’ll do post on this soon) to seal the moisture in after my daily spritzing with water. I decided to do this because I don’t use conditioner on my locs and I my oil has conditioning herbs in it. And it’ll be a pre treatment prior to my weekly washing. So yeah, I’m multi-tasking on my hair. Love that!! lol
I’m really liking the way that my locs are looking and feeling. I even got a complement on my hair from a much older family member yesterday who does not like dreadlocks. Y’all know how the older generation can be about natural hair, not to mention dreadlocks. But I’ll tell ya, you could have knocked me over with a feather as I was shocked!
You might not want to try this if your locs are still new. At least not daily as it could interfere with the locking process. But adding moisture, oh yeah!
Hey guys! Popping in to share my 4 year braidlock anniversary and yeah, it’s real late. My braidlocks turned 4 years old on August 23, 2012. Y’all did get a bit of a preview of what they look like in July. I’ve mentioned it before that my hair growth is on the slower side of normal so there has not been a lot of change or growth since then.
You might be wondering why have in the title braidlocks/interlocks. Well, I used braids to start the locking process and I interlock to maintain. I want that to be clear to anyone who might be reading and thinking about using this method to DIY their own set of locs.
As far as any routine changes, not really. I’m interlocking the roots every other month at the start of the New Moon. And there happens to be one today…a Solar eclipse as a matter of fact. I make sure that I finish before the Full Moon which is two weeks later.
That way I have plenty of time allow for entire day(s) interruptions or if I just don’t feel like being bothered 1 or more days.
It is one of the down sides of having a large number of locs…the maintenance time. But I don’t like the scalpy look and my hair is fine and thin so a small number of locs does not look good on me. That was my pet peeve when my hair was loose. I really did not like the overall look of my twists. And I had 190-200 of them on my head.
I don’t think that I wrote about it but last year I experimented with a 4 and 6 month interval between interlocking sessions. While I absolutely loved the long breaks especially the 6 month break, I did not like the additional amount of time I had to devote to retightening. Also I was having trouble with my hair at the root staying in and with the correct loc.
I’m still washing weekly using raw African Black Soap and my herbal ACV for my scalp. I apply my herb infused coconut oil to my damp locs. I may or may not have mentioned it before, I completely air dry my locs. Meaning after rinsing, I do not use a towel or anything to get the water out of my locs. I let them dry on their own. I’ve found that my locs feel so much better after they are dry and still feel soft and moisturized the next day. And I’m still spritzing the locs pretty much everyday with water and a couple of drops of my favorite essential oils.
I’m still loving this journey and wish I had done this 8 years ago. Then I’d be coming to you with my 8th braidlock anniversary instead of my 4th year anniversary! I’ll get there for sure and for those that are just starting out on your journey, you will get there too!
Ok, here’s a few pics I took at the beginning of last month.
Hey guys! I’m poppin’ in real quick to show y’all my first basket-weave style. What, two styles in a months time…I know right?
Don’t get it twisted as I can assure you this is not the start to any sort of styling trend. 🙂 Though as my locs are getting longer, I’ll be more apt to try some of the simple styles that are just too time consuming to do when one’s locs are shorter and you need a million and one pins to keep everything in place, which I hate.
I got a braid in the front that’s off to the side and secured with a bobby pin and the loose locs at the end of the basket-weave secured with a ouchless band.
Just dropping in real quick to note that today is the 2nd annual Loc Appreciation Day. Here’s hoping that all of us who wear locs and those that appreciate locs are having a wonderful day.
It’s hot so here are a couple of pics of what’s going to be my summer style. My first real ponytail!! Whohoo!!
Here’s a video I did for my YouTube channel showing how I latch/interlock my new growth using my homemade NappyLock tool. It’s a metal yarn needle that I have modified to make it easier to use on my braidlocks.
I hope this demonstration is helpful to you and empowers you to maintain your locs on your own.