How to Make A Cheap Latching/Interlocking Nappylock Tool for Locs

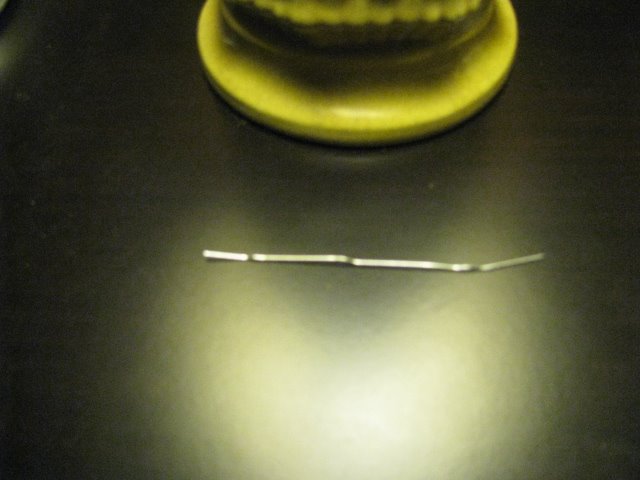
For the past 2 years or so I have been interlocking aka latching my roots with a size 13/16 metal yarn/tapestry needle. These needles can be purchased from almost any craft store. I found mine at Micheal’s in a package of 4 for $3.30 including tax when I first got them and I just purchased another package of 2 today for the same price. So, that means the price has gone up but it’s still much much cheaper than the Nappylock tool.  You might be able to find a larger size so you won’t have to modify it but that’s the only size I’ve been able to find in my neck of the woods.

First let me say don’t get nervous about this being a needle. The business end is rounded so there are not sharp edges or points to damage or snag your hair. Those of you with micro interlocs might be able to use the needle as is. Also it was too long for me to use on my locs when I first purchased the needles at about the 1 year mark. You probably can make it shorter by sawing it down with a hacksaw but I did not want to do that because that was extra work. lol  So I waited until my locs got a bit longer. For me, at the time I started using it my locs at about 15 months were still in the budding/swelling stage especially the ones in the back so I had to make the eye wider. It’s super easy to do however it does take a bit of patience. I’ll confess that I broke two of the needles…that’s how I learned that it takes patience to get it right. lol

What you’ll need for this project is:

  •  A metal yarn/tapestry needle.                 

Of course right?! This reminds me of how my grandmother would give my mother recipe instructions. She’d write in her letter (the recipe was an integral part of the body of the letter) saying, “If you don’t already have (the main ingredient of the recipe), go to the store and get it.” If it was frozen she’d say “unthaw x”. If x ingredient was in a can  she’d say “get the can opener and open the can”. For some reason this was always absolutely hilarious to me, I guess because you’d have to really be an airhead not to understand her instructions.

  • Needle or round nose pliers.
  • Needle-nose pliers

    Image via Wikipedia

    An alternative is a small flathead screwdriver.

    A yellow flathead screwdriver

    Image via Wikipedia

    Note: If you use a flathead screwdriver instead of the needle nose/round nose pliers, then add an extra dose of patience.

Step 1.

Open the pliers and with your palm facing the floor insert the tip of the pliers into the middle of eye of the needle.

Step 2.

Slowly and gently turn the pliers to the left or right, whichever direction is comfortable for you.

Step 3.

Remove the pliers and repeat steps 1 & 2 inserting the pliers further into the eye of the needle until the eye is large enough to fit your largest loc.

It’s important to remove and re-insert the pliers to do it like I said because it forces you to increase the eye a little bit at a time. Trying to get the eye wide enough all at once will result in breaking the eye. Even more so if you are using a flathead screwdriver to do this. Remember earlier I said that I broke 2 needles? This is why. 🙂   Fortunately @ $3.30  for a pack of 4, that means each needle is about $.83 (price based on the first set purchased) and $1.66 each (based on the more recent purchase) so I don’t feel too bad about it.

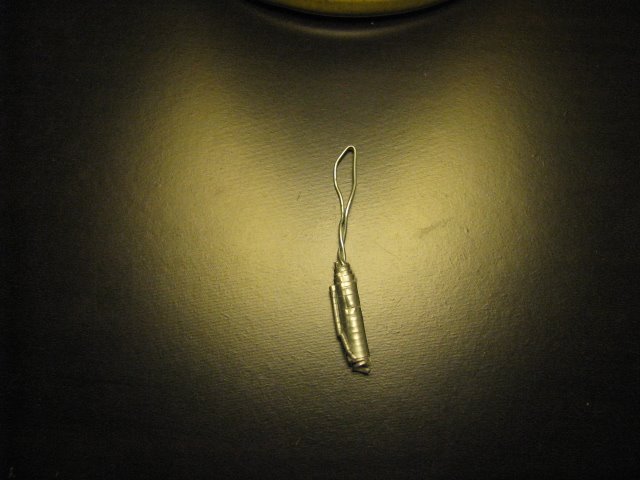
Here’s the final result. 

That wasn’t so bad was it?

If that was not clear and you are able to view video, here is the video I did for my YouTube channel.

Let me know if you use this and how you like it.

Enhanced by Zemanta

Rosemary is in my Hair!

For the last 3 weeks or so I have been experimenting with a spritz that consists of fresh rosemary, a few dried rosebuds and a tiny bit of dried sage. The rosemary you see in the picture above is one of three shrubs from my very own garden…that I’ve been growing for 6 years! And, I’ve not used any of it until now. Can you say, DUH?! Yeah, I’ve been Rip Van Winkle, sleeping big time on this.

Rosemary is an herb/shrub that is very easy to grow. It likes a well draining soil and is drought tolerant once it is established. I planted these in the spring of 2004. Our winter, spring and summers have been drier than normal since ’03 with the worst year in ’07. It was so bad that we had pretty severe watering restrictions but my rosemary made it through just fine surviving on whatever rain Mother Nature gave it. I do not and have not given it any additional water since the first year after it was in the ground. It’s pest free, trouble free and loves the heat and humidity we have. Now that’s my kind of plant. It’s Latin name means “dew of the sea” because it was first discovered growing along the shores of the Mediterranean Sea.

It also smells absolutely wonderful when you brush up against it or run your hand across the leaves. Much better than the essential oil to my nose, but the essential oil is more concentrated. I’ve read somewhere, that it takes 70lbs of plant material to get 1lb of EO. Don’t quote me on that, but I know the ratio of plant material needed to what you get as an EO is pretty wide. You know, kinda like cooking collard greens. When you are picking those big bunches, it looks like you are gonna have a whole mess of greens, but when they finish cooking, you swear somebody stole some out the pot. lol

For hair, fresh rosemary is awesome!! Now I have used the essential oil in the past and it seemed to dry my hair out which I think is why I was afraid to try the fresh or dried but the fresh plant is the exact opposite. And I had no idea how to use it, so that’s probably why it’s taken so long for me to try it. It seems to kick up my herb infused shealoe up 360 notches, takes away the oilyness and leaves my locs nice and soft. Even when there is not much humidity in the air or I’m in an air conditioned place for awhile, my locs are not feeling crunchy like they were before as ,it started to get hot around here. We really don’t have a spring season so it starts to get hot in April, where business feel the need to turn on A/C. A/C draws moisture out of the air so I’m figuring it means it’s doing the same thing to my locs. Since I don’t use A/C, I was noticing that when I did go out, my locs were fine before I left and when I returned home. But they felt crunchy while I was out somewhere, inside under air conditioning. One of the benefits of HIL syndrome I guess, because I may not have noticed that otherwise. I’m also spraying it on my scalp to see if it will stimulate growth along with conditioning my scalp. Rosemary has been used for a very long time as a hair conditioner and for darkening the hair.

I’ll type out how to make your own rosemary water later in the next post and post the video. If you want to see the video sooner, it’s already posted on my YouTube channel, titled “How to make Rosemary Water”.

TTYL

Edited 1/30/2012 while re-tagging after the move to WordPress:

I no longer use rosemary water as a spritz. It was too much for my hair and scalp but I’m considering using rosemary water/tea along with with the sage tea that I use to cut my herbal ACV mix for my scalp. I’ll post about that at a later time but I’ll post the video on the blog here.

How to Set up Mirrors for Rear View Hair Styling/Maintenance

Here is a video from my YouTube channel on how I’m able to see the back of my head while latching, styling (yeah right) or whatever reason I may need to be able to clearly and easily see the back of my head. lol

Celebrating my creativity on my deceased Father’s Birthday today. How I made a hair tie

Today would have been my father’s 69th birthday today if he were still alive. Of course that makes him a Taurus. The planet Venus in astrology rules the signs of Taurus and Libra. One of the things that Venus governs or represents is creativity or artistic expression. I guess he is where I get a lot of my love of music, dance and creative/artistic aesthetic from. I posted this on You Tube Saturday as I was feeling a bit creative that evening. I was going to post it here Sunday when I saw that I had been tagged by Kumina (thanks again sis) you too Nat. As I’m about to condition my scalp with my coconut oil concoction, I though this is the perfect day to post this video on how I made a hair tie.

http://www.youtube.com/get_player

Homemade Interlocking/Latching Tool for Dreadlocks

If you’ve looked at any of my videos on You Tube you’ll realize that I’m a DIYer and I mentioned this too in my introduction post of my blog as well. So my tool of choice will be none other than using what I already have. I mention it in the video but I thought that I’d show pics of it here and tell how it’s made since I did not go into that in the video. Also for the benefit of those who may not be able to view video from You Tube for whatever reason. Shoot, blogs are where I first got my information on locking and at that time I was still using dial-up so viewing video was out of the question.

I got the idea from Miel001 and MsButterfli on YouTube. In that she tells how she made her tool and she demonstrates the 4 point method to tighten her locs. From those videos, I made my tool which starts from a paper clip.

Step 1.  Stretch it out as best you can, then fold it over to form a loop making it as large or small as you like.

Step 2. Twist the ends of the loop together.  You may need to use some regular or needle nose pliers if you got ’em, to make a handle.

Step 3. Lastly, wrap some tape and I used duct tape, around the twisted portion of the tool. It’ll make the tool more comfortable to grip.

Miel001 calls it a “blind needle” because the hole is so big that a blind person could probably use it to sew with. I thought this was a great idea and would be much easier to use than the latch hook and there are  no moving parts to get caught in the hair. Love that and it’s cheap ’cause I already got that stuff lying around the house…did I mention how I love that it’s cheap!!

I hope that this is of use to you and let me know if you’ve made you own tool for latching your locs!


Enhanced by Zemanta

Latching/Interlocking Demonstration

Here’s a video that I did on my YouTube channel demonstrating how I interlock/latch my roots as maintenance for my braidlocks. It’s minus the 2 month update. In it I show how I do the 4 point rotation using a homemade tool made from a paperclip and duct tape.

Enhanced by Zemanta